2017/12/31

Xamarin.Forms on OSX

Not sure how I missed this, but Xamarin.Forms now has preview support for Mac OSX clients.  This is really exciting and I hope they decide to finalize support for OSX as a first-class target.

I spend fair amount of time on OSX, so one of my biggest gripes about Forms was lack of support for a native Mac client.  On Windows I can target UWP and run projects directly on Windows 10.  But, on OSX I have to launch either the iOS or Android target.  Not a deal breaker, but certainly cumbersome.

MvvmCross promises to be a Xamarin.Forms-like MVVM framework that targets more platforms.  But, it seems OSX clients are languishing as a low-priority concern for that project.

Working Client

The xamarin blog's instructions mostly worked.  I added a Cocoa app with the latest version of Xamarin.Forms on nuget (2.5.0) to my Forms solution, and made the required changes.

Everything built, but when I launched it I got a System.NullReferenceException:
1:  Xamarin.Forms.Platform.MacOS.FormsApplicationDelegate.UpdateMainMenu() in   
2:  Xamarin.Forms.Platform.MacOS.FormsApplicationDelegate.DidFinishLaunching(Foundation.NSNotification notification) in   
3:  mobile_app.OSX.AppDelegate.DidFinishLaunching(Foundation.NSNotification notification) in /Users/jake/jade/jade/mobile_app/mobile_app.OSX/AppDelegate.cs:33  
4:  AppKit.NSApplication.NSApplicationMain() in   
5:  AppKit.NSApplication.Main(string[] args) in /Users/builder/data/lanes/5489/c4240f3f/source/xamarin-macios/src/AppKit/NSApplication.cs:100  
6:  mobile_app.OSX.MainClass.Main(string[] args) in /Users/jake/jade/jade/mobile_app/mobile_app.OSX/Main.cs:12  

I found the solution in the xamarin forums.  Need to change the initialization of NSApplication in Main.cs:
1:  static void Main(string[] args)  
2:  {  
3:    NSApplication.Init();  
4:    NSApplication.SharedApplication.Delegate = new AppDelegate();  
5:    NSApplication.SharedApplication.MainMenu = new NSMenu();  // FIX  
6:    NSApplication.Main(args);  
7:  }  
Line 5 is the added line.

Giving me a working- albeit embarrassingly trivial- app:

2017/12/25

Windows 10 IoT Core on Raspberry Pi 3

Following up on my last post, finally got around to trying to install IoT Core on my actual Raspberry Pi device:

My development machine is a 15" Macbook Pro running OSX High Sierra (10.3.2).  Wasn't able to get a Windows 10 VM in VirtualBox to recognize the SD card slot in my adapter (the otherwise fantastic Satechi type-C multi-port adapater), so started looking for how to flash the image without using IoT Core Dashboard.

Image Preparation

Microsoft has some docs about using dism instead of Dashboard.  From the IoT Core download page you can obtain an iso file containing an msi that by default installs the image to:
 C:\Program Files (x86)\Microsoft IoT\FFU\RaspberryPi2\flash.ffu  

ffu2img (https://github.com/t0x0/random/wiki/ffu2img) can be used to convert the ffu to an img file usable with dd found on OSX (and Linux, etc.).

Ensure you're using Python 2.7 and convert the image:
 python ffu2img.py PATH/flash.ffu
Resulting in a flash.img file in the same location as the ffu.

Writing Image to SD Card

To write the image to an SD card I consulted the documentation at raspberrypi.org.

I had trouble getting those instructions to work with my card/reader.  No matter what, dd failed with "Operation not permitted".  In the end I had to:
  1. Insert card into reader and connect reader to laptop
  2. Without unmounting the SD card, run:
     sudo diskutil partitionDisk /dev/disk2 1 MBR "Free Space" "%noformat%" 100%  
    
  3. Disconnect then reconnect the reader (above command seemed to eject the SD card)
  4. Write the image:
     sudo dd bs=1m if=PATH/flash.img of=/dev/rdisk2 conv=sync
In my case, the SD card is /dev/disk2.  /dev/disk2 and /dev/rdisk2 in the above commands should be adjusted appropriately for other cases.

Using df can see several partitions were created (/dev/disk2s1, disk2s2, disk2s3, and disk2s6) on the SD card.  Once inserted in the Raspberry Pi device and powered on, IoT Core should boot.

IoT Core Setup

As it happens, I didn't have a USB keyboard on hand to get the device on the wifi.

Using an ethernet cable to connect the device directly to my laptop, I obtained the device's link-local address from the bottom-left of the touch screen.  The device's admin portal is now accessible by pointing my laptop browser at http://169.254.236.118:8080 (default username/password is Administrator/p@ssw0rd).

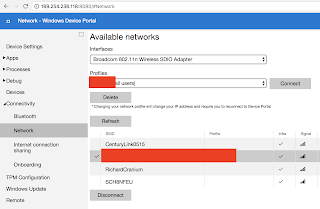
In the left panel, selecting Connectivity, then Network, you can configure the wifi AP:

Initially the display was upside-down (assuming the HDMI port is "up" as when using this touchscreen case).  To fix this, in the left panel pick Device Settings and towards the bottom in Display Orientation select "Landscape (Flipped)":

2017/11/23

Win10 IoT Core Redux

Moments after completing my last post I noticed IoT Core running in the VM reported it had no IP address.  I initially assumed I just had to fiddle with the network adapter settings, but after dong that for a while it appears I can't get networking to work under VirtualBox at all!

Rather than give up, I decided to give VMware a try.

VMware doesn't seem to be able to work directly with the VHD image I'd created- instead expecting a VMDK.  I thought Hyper-V could be used to do the conversion, but it's only able to create a VHDX.  It looks like VMware's vCenter Converter should be able to do it, but I couldn't get that working.  In the end winimage got the job done.

Clicking through the VM setup I was again up and running with a working IoT Core VM.  This time with networking.

I've learned my lesson to not celebrate prematurely.

Last step was installing IoT Core Dashboard and now I should be good to go:

2017/11/18

Win 10 IoT Core

Recently been looking at using a Raspberry Pi 3 for a modestly work-related project.

Since the rest of our platform is running on Windows 10 IoT Enterprise (aka Windows 10 Enterprise LTSB), I thought I'd give IoT Core a look in the hopes that almost no porting would be required.  The hardware compatibility list deserves special mention here because there is far more RaspPi accessories available than are actually supported by Win10.

For various reasons I'm not going to have hardware for over a month, so I'm trying to give things a whirl via virtualbox.  This blog post seems to be referenced numerous places as the reference to get an x86/x64 ISO of IoT Core running in a VM.  But, between using some tool from the XNA developer forums and glossing over several details I started looking for other sources.

This post from a year and a half ago gave me another view as it goes over running IoT Core in VMWare.  It pointed me towards investigating VHD and dism.  A series of MS blogs also gave me a bit better understanding of their usage: this, this, and this.

What follows is what I did in the end to get things running.

Installation

Image Creation


Start by downloading IoT Core.  You want the ISO for MinnowBoard MAX or whatever else is x64.  Mount that and run the msi.  Some stuff is installed to c:\Program Files (x86)\Microsoft IoT\.

Next, need to create a VHD image:
  1. Launch Disk Management
  2. Action -> Create VHD
    • Enter a location for the file
    • Use 8 GB for "Virtual hard disk size"
    • I left everything else as default
  3. Note the name of the drive that was created (in my case it was "Disk 1")
Now copy the IoT Core ffu image to the VHD:

 C:\> dism /Apply-Image /Image-File:”C:\Program Files (x86)\Microsoft IoT\MinnowBoardMax_x64\flash.ffu” /ApplyDrive:\\.\PhysicalDrive1 /SkipPlatformCheck
Where PhysicalDriveN is the "Disk N"- the VHD.

Once it finishes writing, right-click the drive in Disk Management and select "Detach VHD".

VM Configuration


In VirtualBox (I'm using 5.1.26), create a new VM:
  • Version "Windows 10 (64-bit)"
  • Memory size 2048
  • "Use an existing virtual hard disk file" and browse to the VHD
After the VM is created, right-click it and select "Settings".  On the System tab check "Enable EFI (special OSes only)".

Start the VM and after brief startup you should be greeted with:
Sweet, sweet victory!

Detours

There were a few miss-steps along the way.

Despite every reference I found calling out the need to boot with EFI, I managed to overlook that by the time I finally got around to setting my VM up.  Should you do the same, on startup the VM will fail immediately:

 FATAL: No bootable medium found! System halted.  

After that, once I enabled EFI I was dropped into a UEFI shell:
Luckily, I stubbled upon the setup guide for the MinnowBoard MAX which provided the necessary hint.  Guessing that the first device listed was the correct device I tried:

 Shell> fs0:  
 fs0:> efi\boot\bootia32.efi  

Only, it wasn't there.  There was only an efi file for x64- it was trying to boot a 64-bit OS.  I'd followed the old blogs and picked "Windows 10 (32-bit)" when setting up the VM.  Nuking that VM and setting it up as "Windows 10 (64-bit)" like in the instructions above did the trick.

Astute readers might have noticed my host OS is OSX.  The Windows 10 portions were also done within the confines of VirtualBox.

2017/10/24

Return to Xamarin and So Long to PCL

Working on a new project and using C# for the majority of the PC client. We need a mobile app as well, so Xamarin seemed like the logical choice to maximize code reuse.

When previously working with Xamarin I was introduced to PCL. But, I was forever running into problems with platforms I was targeting and the ones supported by packages on nuget.

Apparently well aware of its flaws Microsoft has since deprecated PCL in favor of .Net Standard. We've started targeting the bleeding edge .Net Standard 2.0 since it provides the widest API coverage and meets our platform requirements. What follows is my experience getting a multi-platform (initially just Android and UWP) Xamarin.Forms app using .Net Standard 2.0 building and running with Visual Studio 2017 Community.


Creation

Using the VS 2017 new project wizard, there's currently no obvious way to create a Xamarin app that uses .Net Standard 2.0. Under Other Languages, Visual C#, there's Cross Platform App (Xamarin). Next, for UI Technology choose Xamarin.Forms and Code Sharing Strategy choose Portable Class Library (PCL). From there the following two links got me started converting the PCL project to .Net Standard:


Building

Building for the first time resulted in a bunch of errors similar to the following:
 obj\Debug\netstandard2.0\mobile_app.AssemblyInfo.cs(14,12,14,54): error CS0579: Duplicate 'System.Reflection.AssemblyCompanyAttribute' attribute  
 obj\Debug\netstandard2.0\mobile_app.AssemblyInfo.cs(15,12,15,60): error CS0579: Duplicate 'System.Reflection.AssemblyConfigurationAttribute' attribute  
 obj\Debug\netstandard2.0\mobile_app.AssemblyInfo.cs(16,12,16,58): error CS0579: Duplicate 'System.Reflection.AssemblyDescriptionAttribute' attribute  
To fix this, I need to remove Properties/AssemblyInfo.cs from the project.
 App.xaml.cs(6,7,6,14): error CS0246: The type or namespace name 'Xamarin' could not be found (are you missing a using directive or an assembly reference?)  
 MainPage.xaml.cs(6,7,6,14): error CS0246: The type or namespace name 'Xamarin' could not be found (are you missing a using directive or an assembly reference?)  
 App.xaml.cs(10,32,10,43): error CS0246: The type or namespace name 'Application' could not be found (are you missing a using directive or an assembly reference?)  
 MainPage.xaml.cs(10,37,10,48): error CS0246: The type or namespace name 'ContentPage' could not be found (are you missing a using directive or an assembly reference?)  
 App.xaml.cs(19,33,19,40): error CS0115: 'App.OnStart()': no suitable method found to override  
 App.xaml.cs(24,33,24,40): error CS0115: 'App.OnSleep()': no suitable method found to override  
 App.xaml.cs(29,33,29,41): error CS0115: 'App.OnResume()': no suitable method found to override  
For this, right-click VS project, Manage NuGet Packages, and add Xamarin.Forms.
 error : Project 'mobile_app\mobile_app\mobile_app\mobile_app.csproj' targets '.NETStandard,Version=v2.0'. It cannot be referenced by a project that targets 'UAP,Version=v10.0.10586'.  
I couldn't just build a UWP application with .NetStandard 2.0, it required upgrading Visual Studio 2017 to 15.4 and setting the Minimum Version of the UWP project to "Windows 10 Fall Creators Update" (may first need to set Target Version to the same).
 Could not load file or assembly 'netstandard, Version=2.0.0.0, Culture=neutral, PublicKeyToken=cc7b13ffcd2ddd51' or one of its dependencies. The system cannot find the file specified.  
 'netstandard, Version=2.0.0.0, Culture=neutral, PublicKeyToken=cc7b13ffcd2ddd51'  
   at System.ModuleHandle.ResolveType(RuntimeModule module, Int32 typeToken, IntPtr* typeInstArgs, Int32 typeInstCount, IntPtr* methodInstArgs, Int32 methodInstCount, ObjectHandleOnStack type)  
   at System.ModuleHandle.ResolveTypeHandleInternal(RuntimeModule module, Int32 typeToken, RuntimeTypeHandle[] typeInstantiationContext, RuntimeTypeHandle[] methodInstantiationContext)  
   at System.Reflection.RuntimeModule.ResolveType(Int32 metadataToken, Type[] genericTypeArguments, Type[] genericMethodArguments)  
   at System.Reflection.CustomAttribute.FilterCustomAttributeRecord(CustomAttributeRecord caRecord, MetadataImport scope, Assembly& lastAptcaOkAssembly, RuntimeModule decoratedModule, MetadataToken decoratedToken, RuntimeType attributeFilterType, Boolean mustBeInheritable, Object[] attributes, IList derivedAttributes, RuntimeType& attributeType, IRuntimeMethodInfo& ctor, Boolean& ctorHasParameters, Boolean& isVarArg)  
   at System.Reflection.CustomAttribute.GetCustomAttributes(RuntimeModule decoratedModule, Int32 decoratedMetadataToken, Int32 pcaCount, RuntimeType attributeFilterType, Boolean mustBeInheritable, IList derivedAttributes, Boolean isDecoratedTargetSecurityTransparent)  
   at System.Reflection.CustomAttribute.GetCustomAttributes(RuntimeAssembly assembly, RuntimeType caType)  
   at System.Reflection.RuntimeAssembly.GetCustomAttributes(Type attributeType, Boolean inherit)  
   at System.Attribute.GetCustomAttributes(Assembly element, Type attributeType, Boolean inherit)  
   at System.Attribute.GetCustomAttribute(Assembly element, Type attributeType, Boolean inherit)  
   at System.Reflection.CustomAttributeExtensions.GetCustomAttribute[T](Assembly element)  
   at Microsoft.Build.Tasks.ProcessResourceFiles.ReadAssemblyResources(String name, String outFileOrDir)  
Updating Microsoft.NETCore.UniversalWindowsPlatform package to the latest version on nuget solved this. There's also a warning about incompatible versions of Xamarin.Forms, but for that I just removed the reference to the old assembly from the UWP project.


Running

 DEP3321: To deploy this application, your deployment target should be running Windows Universal Runtime version 10.0.16299.0 or higher. You currently are running version 10.0.15063.674. Please update your OS, or change your deployment target to a device with the appropriate version.  
Here we're targeting Fall Creators Update but I wasn't running it yet. Previously I would have to enroll in Windows 10 Insider Preview, but as of today Fall Creators Update is officially released. Finally, I'm not sure if this is actually required for UWP apps, but it's needed for Android so I'll mention it here anyway. Xaml files need to be available at runtime, so right-click each and in Properties set "Build Action" to "Embedded resource".


2017/10/19

Migrating Orleans backend from Windows to Linux, AWS, and beyond

This is a draft of a post I composed in March, 2016. Only partially completed, but maybe it will be of some value to someone.

Our backend has been based on Microsoft Orleans (MS Research, GitHub) for some time. We're primarily running the entire backend- deployment and all- on Windows 7 mostly because:

  1. It's convenient since all developers are running Windows on their desktops
  2. It's easier for QA to test and operate playtests until everything is fully automated and we've got devops tools in place
  3. Our company is mostly a "Windows shop" anyway
It's been a long time coming, but we've finally gotten around to looking at running the backend on Linux. A few components, namely Zookeeper and MongoDB are fairly straight-forward since they're arguably intended to run on Linux. That leaves Orleans itself and, of course, our own game server.

Orleans should "in theory" work fine on top of Mono. However, our Orleans projects are a bit of a mess, so I thought I'd just try running the binaries produced by Visual Studio. And shockingly (see "...debug everywhere"), it mostly worked; we only ran into the following problems:

  • We use log4net and our App.config was specifying ColoredConsoleAppender which didn't work on Mono (switched to ConsoleAppender)
  • We spawn our game servers using Process.StartInfo.UseShellExecute = true and caused an error "xdg-open: unexpected option ..." (we set UseShellExecute to false on Linux- Windows seems to require it)
  • Our config file had a Windows "smell"
  • It refused to startup with the version of mono that ships with Ubuntu 14.04, but installing the latest, stable version fixed that
Next came getting our game server to compile and run on Linux. Luckily, our WAF-based build system should "just work" on Linux (in theory). Most of the compilation and runtime problems fell into just a few categories:
  • Hard-coded windows specific paths and commands
  • Paths that were incorrect with a case-sensitive filesystem
  • Asserts that were triggered by incomplete implementations

N.B.: At the time of writing we were using CryEngine 5.0. Since then the WAF buildchain has been retired in favor of cmake

Our initial round of deployment scripts where based on PowerShell 3.o and left a lot to be desired. PowerShell 3 (as opposed to 1 or 2) was chosen because it provided disconnected sessions allowing us to execute things on a remote machine and leave them running in the background without leaving a shell connected (or installing as a service). But, PowerShell 3 isn't installed by default on Windows 7 and then some other stuff is needed on remote machines to get remote commands working at all. Generally speaking, it was the overall idiosyncratic behaviour (Invoke-Command takes PSCredentials but old commands like "net use" don't- and there's apparently no modern replacement), and unfamiliar syntax (passing ArgumentList to Invoke-Command's ScriptBlock) that made the PowerShell prototype take longer than I expected. And there's still a few things that just don't work. Granted, I'm a completely new to PowerShell, and like all advanced tools there's a nontrivial learning curve. PowerShell is without a doubt leaps and bounds better than cmd.exe, and some aspects like getting auto-complete for commands and arguments in the ISE were welcome.

In a completely unfair comparison (given that I have non-trivial Linux experience), we were able to fully automate deployment to Ubuntu in under a day. The frustration of Invoke-Command/Credential/InDisconnectedSession was replaced with the relatively straightforward use of ssh and nohup. And, once you get password-less ssh and sudo setup, and embrace other commands like screen, working with multiple remote machines is a breeze.

All-in-all we were up and running on Ubuntu 14.04, rocking nightly builds in Jenkins, deploying to AWS, and doing playtests within a week. *opens a beer*